Coloring modeling chocolate opens up a world of creativity for decorating cakes, cupcakes, and other sweet treats. Whether you envision vibrant hues or subtle shades, mastering the art of coloring modeling chocolate allows you to bring your artistic vision to life.
Choosing the Right Chocolate
The type of chocolate you use impacts the vibrancy and outcome of your colors. White chocolate serves as a blank canvas, readily accepting and showcasing bold, bright colors. Dark chocolate, on the other hand, produces more subdued tones and is ideal for earthy or rustic designs. Milk chocolate falls somewhere in between, offering a balance of color payoff and a slightly richer flavor.
Essential Tools for Coloring Success
Before you begin, gather the following tools to ensure a smooth and successful coloring process:
- High-quality white, milk, or dark modeling chocolate: Opt for a reputable brand specifically designed for modeling.
- Food coloring gels or candy melts: Gels offer concentrated color and are less likely to change the consistency of your chocolate.
- Toothpicks or lollipop sticks: Use these to add small amounts of coloring at a time, ensuring precise control.
- Microwave-safe bowls: Choose bowls dedicated to melting and coloring chocolate.
- Rubber spatula or spoon: These tools are essential for mixing and incorporating color evenly.
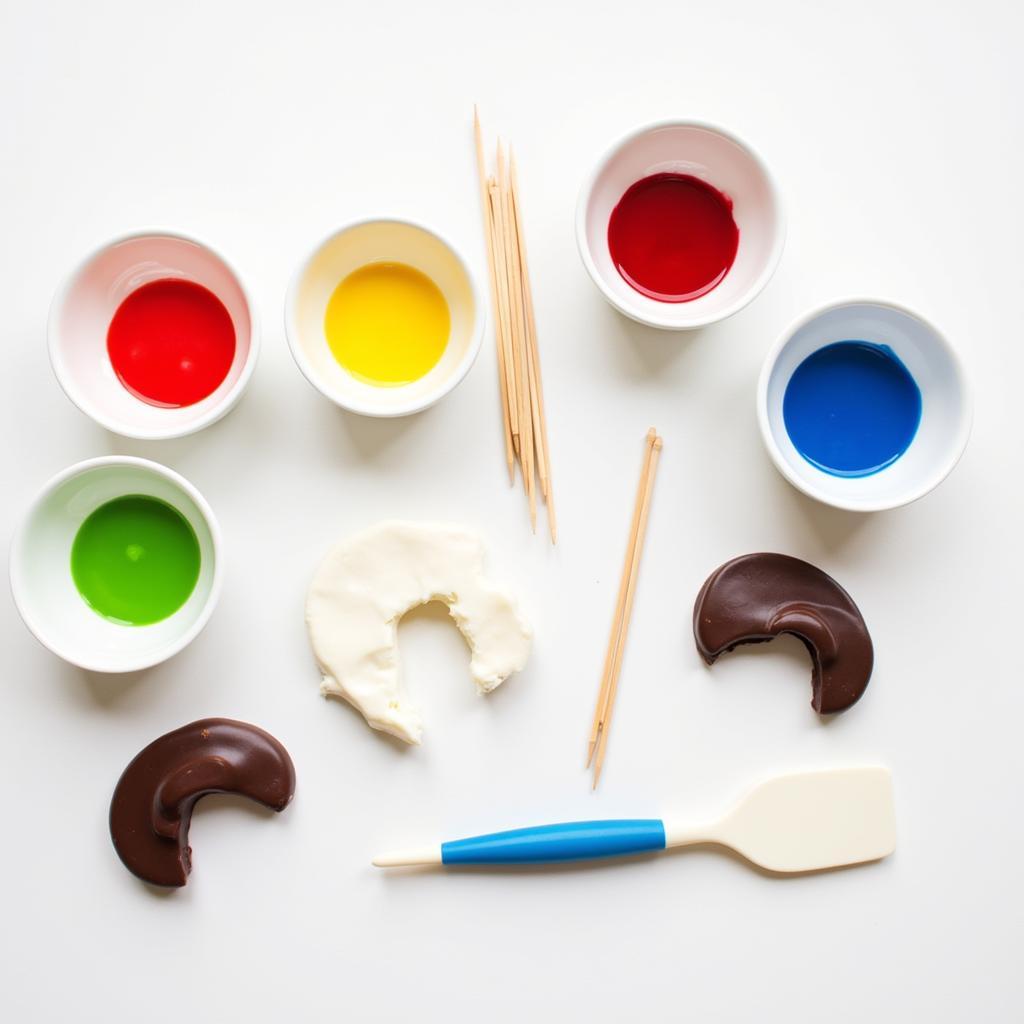 Essential tools for coloring modeling chocolate
Step-by-Step Guide to Coloring Modeling Chocolate
Follow these steps to achieve perfectly colored modeling chocolate:
-
Melt Your Chocolate: Begin by microwaving your chosen chocolate in short bursts, stirring frequently to prevent scorching. Aim for a smooth, completely melted consistency.
-
Introduce the Color: Dip a toothpick or lollipop stick into your desired food coloring gel and swirl it into the melted chocolate. Start with a small amount, as a little goes a long way.
-
Mix Thoroughly: Use your spatula or spoon to blend the color into the chocolate, ensuring it’s evenly distributed.
-
Adjust Color Intensity: If you desire a more intense hue, gradually add more food coloring, mixing thoroughly between each addition, until you achieve your desired shade.
-
Test the Color: To accurately assess the color, place a small amount of chocolate on a piece of parchment paper and allow it to cool slightly. The color will darken as it cools and sets.
-
Knead for Even Distribution (Optional): For larger batches or when using multiple colors, kneading the chocolate like dough can help distribute the color more evenly.
Tips and Tricks from a Color Expert
Here are a few expert tips to elevate your modeling chocolate coloring:
-
“When working with multiple colors, always start with the lightest shade and progress to the darkest. This prevents color contamination and ensures clean, accurate hues.” – Ava Chen, Pastry Chef and Color Specialist
-
To create marbled effects, add small dollops of different colored chocolate to your main batch and gently swirl them together with a toothpick.
-
For a watercolor effect, paint diluted food coloring onto the surface of your molded chocolate creations using a fine-tipped paintbrush.
-
Remember that oil-based food colorings are not suitable for coloring modeling chocolate, as they can cause the chocolate to seize.
-
Practice makes perfect! Don’t be afraid to experiment with different color combinations and techniques to discover your signature style.
Conclusion
Coloring modeling chocolate is an enjoyable and rewarding process that allows you to personalize your culinary creations with a touch of artistry. By understanding the basics of color theory, choosing the right tools, and following these simple steps, you can confidently transform ordinary modeling chocolate into a vibrant masterpiece. Let your imagination run wild as you explore the endless possibilities of color and bring your sweetest visions to life.
FAQs
Can I use liquid food coloring to color modeling chocolate?
While liquid food coloring can be used, it’s important to note that it has a higher water content compared to gel coloring. Adding too much liquid can affect the consistency of the chocolate, potentially making it too soft or difficult to work with.
How do I prevent air bubbles in my colored modeling chocolate?
To minimize air bubbles, avoid over-mixing the chocolate, especially when adding color. If bubbles do appear, gently tap the bowl on the counter a few times to help them rise to the surface.
Can I store leftover colored modeling chocolate?
Yes, wrap any leftover colored modeling chocolate tightly in plastic wrap and store it in an airtight container at room temperature for up to 2 weeks.
Need help with your next creative project? Contact Color Box Hanoi!
For personalized color consultations, expert advice on paint selection, and professional home painting services, don’t hesitate to reach out. Our team of color specialists is here to help you transform your vision into reality.
Contact us today:
Phone: 0373298888
Email: [email protected]
Address: 86 Cầu Giấy, Hà Nội
We have a dedicated customer service team available 24/7 to assist you.